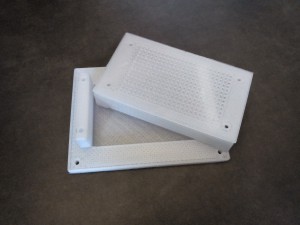
Having the correct and proper enclosures, is a mechanical (and also a marketing) problem many electronics projects suffer from. It is also related to anticipated sales numbers. For big numbers, a custom enclosure which is produced with an injection molding machine is not a big cost since the financial burden can be divided and written off across many items. It takes time and effort to create the design and to finalize the mold, but production goes very quickly. When you have much fewer anticipated sales numbers, you can go for generic off-the-shelf enclosures, or you will have to make a cost effectiveness calculation to determine whether is worthwhile to design your own enclosure and have the production outsourced.
3D printing feasibility
Recently, another interesting possibility has emerged: 3D printing. For our project, we could not find suitable generic electronic boxes so we had to design and prototype our own. The question we also had about 3d printing prototypes and – a step further – 3D printing small production series is simply: “is the 3D print quality (with fused deposition modeling) good enough?”. If that is the case, it would be a very cost-effective solution.
Experiments
The printer we did the first experiments with, is a so-called RepRap-clone. A cheap desktop model printer which costs around 600 Euro (fully assembled). All hardware, firmware and software is open source and a lot of similar 3D printer models can be found. The 3D printer can execute G-code which contains commands for positioning and extrusion of the thermoplastic. The G-code program (or the object print instructions) can come from a connected PC (Linux, Mac or Windows) via USB or they can be put on a SD-card and inserted in the 3D printer’s electronics. If printing from SD-card, the initial print command still has to be given by the host PC for our 3D printer. More advanced printers, can work completely stand-alone or get their program via USB, wired network of WiFi.
Software
For the enclosure prototype design, we used OpenScad because it is a kind of (script) programming language where all the 3D object dimensions are parameterizable. This “.scad” file can be exported to STL, which describes the object as connected triangles. The STL file is then converted to G-code by so-called “slicer” software: It converts the 3D object in layers which can be printed by the fused deposition modeling process.
Thermoplastics
Our particular extruder can melt and deposit thermoplastics at a maximum temperature of 250°C. The most used plastics are PLA (PolyLactic Acid, a biodegradable thermoplastic aliphatic polyester derived from renewable resources) extruded at a temperature of around 190°C and ABS (Acrylonitrile Butadiene Styrene) which is extruded around 230°C. There are other usable filaments, but they are more difficult to use or require higher extrusion temperatures. One can print with nylon, polycarbonate, PET and many other plastics.
In order to select to most suitable filament, the following criteria are considered the important for our application:
- detail or printing precision
- result durability
- electrical properties
- thermoplastics temperature resistance
The easiest to investigate is temperature resistance because we can look it up in the filament properties.
PLA is only good to about 50 to 60°C. ABS, depending on the source and the quality, can withstand about 80 to 105°C. So, ABS seems the better selection for now, but we are also looking into other filaments, such as Premium PLA 90, where the softening temperature is a little bit higher than 90 °C, or Nylon (taulman 618), or Polycarbonate, or Premium ABS Filament.
The advantage of Premium PLA 90 (just like other PLA) is that it is 100% biodegradable. Which is nice when you are marketing “green” products. 🙂
For ABS, a heated bed is required because it tends to shrink more when cooling down. The shrinkage was a desired property of the ABS thermoplastic at its inception because when injection-molded it will release itself easier from the mold. However, when using the extrusion process, as in a 3D printer, one must take extra precautions to keep the ABS sticking to the print bed for the duration of the print. Applying the ABS slurry (which is a mix of aceton and ABS) to the bed did work, but now we are using an ordinary plastic based hairspray to attach the first layer to (and this works quite well).
Printer quirks
The most missed capability of this printer, is the ability to control it without requiring a host PC. One still has to give the SD print command via the host. We also noticed that we needed to logically disconnect the printer after giving this print command, because otherwise the printer could freeze. The usb-serial communication does not seem very stable.
It took some time to get the printing process right. We had to fiddle with lots of parameters and get to know the printer, but the current results are good enough to be categorized as sell-able.
Speed
Another aspect is production time. On a single printer it can take up to 8 hours to print an enclosure (bottom and cover). So, this means 3D printing is only feasible for prototyping or very small production numbers.


Nice that you’ve started with 3d printing.
On the RepRap clone you can connect an SD cardreader
available at reprapworld ( http://reprapworld.com/?products_details&products_id=422&cPath=1591_1647 )